
The first step to charge for items in ActionFlow is creating a unique SKU Item that is assigned to a SKU class. After the SKU item is created, it is added to a price list where you define pricing for that item.
(Click the steps to go to that section)


Other Resources:
How to Setup SKUs Guide downloadable version: .png?width=67&height=67&name=PDF%20ICON%20(1).png)
Step 1- Create a SKU Class
Follow the steps below to add a new SKU Class:
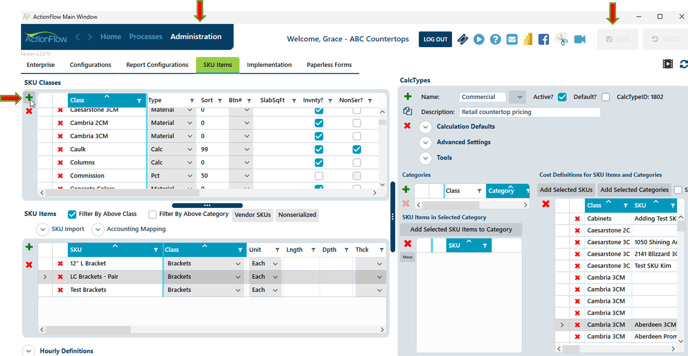
- Click on the Administration tab on the top navigation bar. Once in the Administration Tab, locate the SKU Classes on the left side of the screen.
- Click the Green Plus sign to add a new SKU Class.
- Complete the key Class properties listed here. There are additional properties (described below) that may or may not apply to the class.
- Class – the name of the group of SKU items
- Type – how SKU classes are grouped
- Sort – the order the class will appear on customer reports
- Invnty? – whether the class is inventory
- Click on the Save button in the upper right-hand corner to save the SKU Class.
SKU Class Properties
This is a brief overview of the SKU Class Properties. (Click on property to learn more)
|
Property |
Description |
|
Name of the Class – this will define a group of SKU items |
|
|
The SKU classes are grouped into classes, and they fall into different Types. The different Types are listed in this dropdown |
|
|
The Sort number defines how line items will be sorted in the area module and various reports |
|
|
Add buttons to the area module to quickly access a SKU class. |
|
|
Track the SKU items in this class as Inventory items |
|
|
Designate non-serialized inventory items that will not have a unique ID (ie. caulk, brackets, polishing pads, sinks, etc.) |
|
|
Designate the class as sinks for sink reports |
|
|
Maps classes in ActionFlow to the name in your item list in QuickBooks |
|
|
Map inventory to an item that is also an inventory part in QuickBooks. |
|
|
Define groups for the Span report |
|
|
Estimate how much material is wasted to calculate cost and margin |
|
|
Assign a default vendor for inventory classes |
Step 2- Add a SKU Item to a SKU Class
To manually add a new SKU Item:
- Select the SKU class to which it belongs.
- Once the SKU Class is highlighted blue, click on the green plus sign under the SKU Items Section.
- Fill out the information based on the columns above that you want to add. (The SKU, SKU Class and Unit are required columns)
- Click on the Save button in the upper right-hand corner.
Note: If both the SKU class and SKU item are new, you will need to refresh the SKU page or leave that class and come back to it to see the new SKU item.
To add SKU items in bulk, you can use the SKU Import Tool.
Use the Vendor SKU Tool to set depth, length, and cost for SKU items specific to each vendor.
We take the SKU page seriously because it impacts your shop’s bottom line. Therefore, we recommend working with your account manager to learn how to add SKU items before making changes on this page.

SKU Item Properties
This is a brief overview of the SKU Item Properties. (Click on property to learn more)

|
Property |
Description |
|
A unique name for the SKU item |
|
|
Identifies the SKU Class |
|
|
Unit of measure for SKU Item calculations |
|
|
Default Length – applies to slabs |
|
|
Default Depth – applies to slabs |
|
|
Designate a SKU Item as Stock |
|
|
Default Thickness – applies to slabs |
|
|
How much the item costs per unit |
|
|
The surface area of a slab – ie. total square feet of slab |
|
|
The total cost of a slab |
|
|
Presort items into pricing groups |
|
|
# of nonserialized items in stock |
|
|
Set the minimum for # inventory items before more need to be ordered |
|
|
Set the margin for a material SKU item that overrides the Price List’s default margin |
|
|
Default laminate width |
|
|
Other names for the SKU Item, usually for materials |
|
|
Provide a detailed description that will appear on reports |
|
|
A drawing item is a line item that is added to a countertop and shows up on the drawing |
|
|
DrawValues define the appearance of drawing items - see detailed instructions for each drawing item |
|
|
^ |
|
|
^ |
|
|
Link SKU items to a drawing item – ie. a sink model with an undermount cutout |
|
|
Add images that will be displayed on reports for a SKU item |
|
|
Set remnant percentage value of a slab that is carried over when a remnant is created |
|
|
Maps SKU items in ActionFlow to the name of items in QuickBooks |
|
|
Map inventory to an item that is also an inventory part in QuickBooks |
|
|
Default revenue price charged to customer |
|
|
Designate items for T dollar calculations (material and inventory items) |
|
|
Cost % |
Calculate the cost of a SKU item as a percentage of the cost of other line items This feature is now obsolete. Use the %Target and Percent feature |
|
The Default Category is used as part of the SKU Import function to automatically add the item to a category |
|
|
Tax Code Override - Match tax codes that are set up in QuickBooks |
|
|
When checked, the SKU item will appear in the Install Schedule Checklist |
|
|
Last user to edit this SKU Item |
|
|
Unique ID to the SKU item, used by AF developers |
Next Step: Adding SKU Items to Price Lists


Filters and Search Options in Grids
Filter by Above Class
The SKU Items section is filtered by class by default. You can see all SKU Items at once by unchecking the “Filter By Above Class” box. Clicking the “SKU” column header will then display the SKU items in alphabetical order which can help identify SKU items that have similar names.


Filter
Most of the columns in ActionFlow grids can filter based on certain criteria. Click the icon, set your search criteria, then click “filter.”

Full Text Search
A “Full Text Search” allows you to search an entire grid for matching text. To access this tool, select a row in any grid and then hit “Ctrl + F” When you begin typing, Actionflow will highlight and filter data rows that contain that text.

