Learn how to enter slabs into ActionFlow by watching the video or following the guide provided below.
Downloadable guide (or view below)
.png?width=92&height=92&name=PDF%20ICON%20(1).png)
Table of Contents
- Intro (0:00)
- Create a New Order (0:22)
- Attach a Vendor (0:40)
- Add Inventory Items (0:50)
- Duplicate Slabs (1:34)
- Create Purchase Order (1:54)
- Email/Print Purchase Order (2:30)
- Track the Inventory Process with Actions (2:40)
- Barcodes (4:20)
- Other Inventory Tasks (Allocate Slabs, Nonserialized, Reports) (4:45)
- Receiving Worksheet (5:00)
Inventory Training Guide
Step 1- Entering Slabs in the Inventory Module (Create Order)
The only way to enter an inventory item into ActionFlow is by creating an inventory order and then adding items to that order. Here are the steps for creating an inventory order:
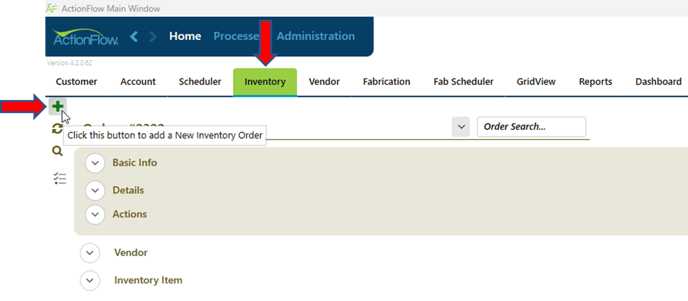
- Go to the Inventory Tab to create a new order.
- Click the Green Plus sign to the left side of the screen to create an order.
3. Click on the Vendor tab to open the section and select the supplier you will be ordering from under the drop-down box.

4. Click the drop down for the Inventory Item Data Section and then click on the Green Plus sign in that section to add a slab.

We recommend switching to the “Inventory Item View” which expands the Inventory Item Data Section and hides the Order and Vendor data.

5. From the drop downs, select the Class, SKU. If desired, you can enter the slab dimensions (length and depth). ActionFlow will automatically calculate the square feet once it refreshes. Click the Save button in the upper right-hand corner of the screen.

6. If you have multiple slabs to order, you can click on the Dup button to duplicate the slab. You can also enter in the number of slabs you want to duplicate in the box below the Dup button, and then click Dup to duplicate multiple slabs.

7. To run the Purchase Order report, go back into the “Inventory Order View.” Click on the Task menu, Reports and then Purchase Order. (This can also be located under the Reports Tab). You can email, print, or save the PO to send to the vendor to order the slabs.


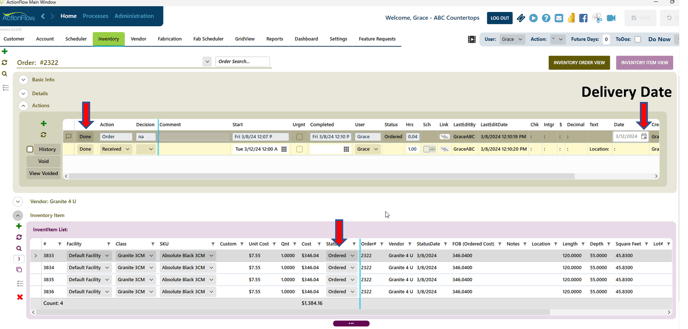
8. To track the Order, open the Actions Tab and click the green plus sign. This will create a new Order action for the Order.

9. Enter the delivery date of the slabs and click on the Done button. As you can see this changed the status of the order and the slabs to Ordered. This will also create a Received Action for the slabs.
Step 2- Receiving an Order
- When the slabs arrive, enter the slab location for storage in the text box. Enter your decision in the drop-down box and click Done. Please note the status of the Order has changed to received and the status of the slabs have changed to available.


Barcodes
If you have a barcode printer set up, print out barcodes using the “Barcode” reports which can be found in the Inventory Order Task Menu.
Check out this resource for barcode troubleshooting and recommended equipment.
Check out these resource for printing remnant barcodes.


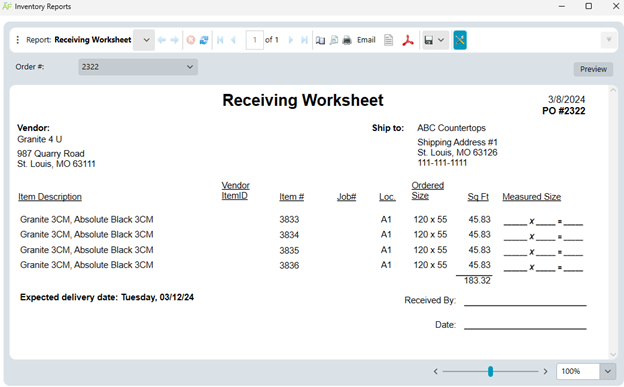
Receiving Worksheet
The Receiving Worksheet allows you to check in slabs once they have been received. This is a popular report, so we wanted to bring attention to it here.