Downloadable version:
.png?width=80&height=80&name=PDF%20ICON%20(1).png)
Downloadable version (Metric):
.png?width=84&height=84&name=PDF%20ICON%20(1).png)
Step 1- Create a Customer
Create a customer using the quote Wizard or by manually entering a customer
Option 1: Quote Wizard-
1. Click on the Quote Wizard icon to the left side of the Home Tab Screen. You can enter in the client information here and click okay. This will create a new quote and open the Area Module, where you can enter your quote.

Option 2- Manually enter a new customer
1. Click on the green plus sign on the left side of the Home Tab Screen.

Enter the Customer Name and update the customer information. Click Save. (If it is greyed out, ActionFlow autosaved your data.)

2. Create a Job by clicking the green plus sign on the left side of the Home Tab.
Customer View

Job View

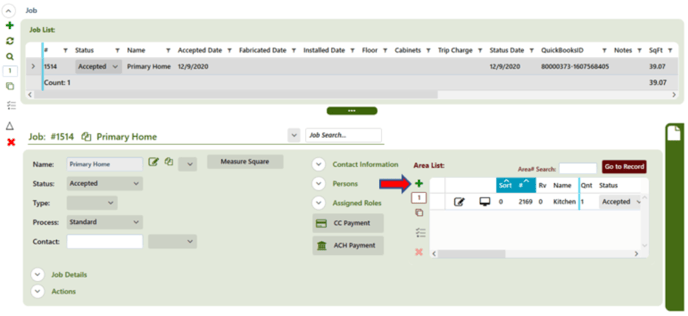
3. Create an Area in that job by clicking on the green plus sign in the area section.
Step 2- Create a Quote
The process for creating a quote can be described in these steps:
1) Add Required Area Data
2) Enter data for calculating square footage
3) Enter data for edges
4) Add additional options to the top
5) Add additional line items for quote
6) (If applicable) Enter data for calculating slab prices
The steps above are described in more detail below:
1) Add Required Area Data (You can select a name for this Area in the drop down or you can highlight the field and type in your own custom name)
The items below are required for all quotes:
• Select a CalcType, which sets the prices that will apply for this quote.
• Select the Material
• Select the Color
• Select the Edge Default

2) Enter data for calculating square footage
You have three options for entering the information that is used for calculating square footage:
• Option 1: Override Section
• Option 2: Create rectangular tops
• Option 3: Create tops using the Drawing feature
The three options are described in detail below:
Option 1: Override Section
(The drawing is not required)
1. Expand the Override Section in the area data
2. Enter applicable values in the section and click the Calc and Save button on the right side of the screen to calculate override data that was entered.

If you don’t see the Overrides section in the area module, it may be hidden from Basic view – edit the view to see it. Note: The “Name Override” also has to be displayed in Basic view for the Overrides to appear.
If you still don't see it, it may be hidden for that price list.
Option 2: Create tops with predefined shapes.
1. On the Customer Layout Section of the quote, use the predefined shapes button to create the top. Change the dimensions of the top by clicking the numbers. The top length and depth will also be displayed in Top Details.
2. Once a top is created, you can hover over the dimension to click and highlight the field. Once the box is selected, you can update/change the measurement. You can also hit the tab key to tab over to the other dimensions, so that you can modify them as well.

Option 3: Create tops using the Drawing feature
1. If you have a shape that is not predefined (a batwing with non-45° angles), use the “Draw” button.

2. Click on the open drawing area to begin drawing a top. One thing to emphasize is that you should release the mouse after your initial click. This is not a dragging action, but a click and release action. This is important, because if you want to change direction, you will click again.
• Click the round Draw button
• Click on the drawing page to get a starting point, release click, do not hold down mouse button
• Move your mouse to start drawing your tops
• When you are ready to make a turn/angle/Etc. Click your mouse to mark a stopping point and release. Make your turn/angle as you start to draw again. When you are ready to make a turn/angle/Etc. Click your mouse to mark a stopping point and release. Make your turn/angle as you start to draw again. Continue until tops are drawn.
• Right click on your mouse to save the top and complete.
3) Enter data for edges
There are three options for each edge on a top: Unfinished, Finished and Backsplash. To change the edge on a top, you must first select the top by clicking on it (it will be highlighted in blue to indicate it is selected). Hover over the top and move your mouse close to the edge of the top and notice the mouse turns to a hand.

As you continue to click on the top, it will cycle through the Unfinished, Finished and Backsplash options:

4) Add additional options to the top
You can right click on a top to add multiple options to that specific top.

5) Add additional line items for quote
There are some line items that can’t go on the drawing, for example a tearout. Those items are adding on the Line Items tab in the Area Module. To add one of those line items, follow these steps:
• Go to the Line Items tab on the Area Module

• Each Line Item has a Class and a SKU. First, select the Class in the drop down, which will add the Line Item to the list.

• From the drop down, select the specific SKU within the class. Click Calc + Save + Drawing to calculate the cost for the top.

6) (If applicable) Enter data for calculating slab prices
1. You can do a calculation by slab. This can be done by selecting a color that is defined (in the Administration settings) to be priced per slab or by overriding the unit if you have permission. The slab revenue value can be pre-entered, but you can also change them at the time you do the calculation.
2. Click on the Open Inventory Items button under the Area Data field to open the Slab Details Grid.

3. Click on the Green Plus sign under the Slab Details area to add slab information. You can click on the plus sign multiple times to add multiple slabs.

4. If the slab information is pre-entered in, you can change the information by clicking on the fields. Enter in your Length, Depth and SqFt Price. Click Calc and Save to create quote.

Step 3 - Print Out or Email Quote
Once the quote has been calculated, you will probably want to print out or email a copy of the quote. To do so, click on the Customer Layout tab and the go to the left side of the Area Module to locate the Reports. This is where you can locate your Estimate to print, save or email to the client directly.

You can email, print, export or save your quote to the job files by clicking on the icons below:
• Print Icon- Print a hard copy of the Estimate
• Email Text- Email quote from within ActionFlow to your client
• Document Icon- Save Estimate to the job files
• Adobe – Open quote in Adobe Reader
• Save Icon- Export Estimate as a PDF, CSV File, EMF Description, Excel, Rich Text Format, TIFF file, Web Archive

